Note-taking workflow
/ 12 min read
Table of Contents
I previously wrote a blog about my 2-year-long struggle with finding an optimal note-taking solution. In this blog post I wanted to document and go through how I create my notes with ease and efficiency.
Quick capturing notes
Quickly capturing ideas and notes whilst I am working is important to me. I often work within the terminal and Neovim and do most of my writing and work in this way. This means that when I want to quickly capture a note I don’t necessarily want to be leaving the terminal (or the keyboard for that matter and reach for my mouse). Instead, I want to be able to capture the note or idea at the speed of thought .
Tmux
Arguably, Tmux is a blog post in and of itself. Tmux is a terminal multiplexer that I use inside the terminal so that I can quickly switch between different panes. This means that I can have multiple terminals open inside a single terminal. Then all I need to do is press Ctrl + b and then a number which to switch to, most of the times it is 3. So I can quickly switch to my “notes” terminal by in quick succession press Ctrl + b, 3.
Tmux is great because it remembers which terminal pane you were in previously. So when I want to switch back I can in quick succession press Ctrl + b, b to go back.
Here I do not modify the built-in Tmux keyboard bindings, this is because if I was running inside a server with stock Tmux I don’t need to relearn the key bindings. I often see users switch the leader key to be Ctrl + a instead of keeping with default but if for whatever reason I wanted to switch to a different system I would have to make sure that it is using my own .tmux.conf file.
I digress, so now I’ve switched to my notes terminal now what?
Shortcut to create a new note
Once in the terminal, I have a bash script called on. This is short for obsidian new. This was inspired by this YouTube video.
Here is what the on script looks like:
#!/usr/bin/env bash

# Check if a file name is providedif [ -z "$1" ]; then  echo "Error: A file name must be set, e.g. \"the wonderful thing about tiggers\"."  exit 1fi
formatted_file_name="${1}.md"cd "/home/adam/notes" || exittouch "00 - Inbox/${formatted_file_name}"nvim "00 - Inbox/${formatted_file_name}"
So firstly, I check if there is an argument given to on if not then I get an error and the script exits.
If I do provide an argument then it appends the .md file extension to the name of the note.
Next, the script changes to where I store my notes in the obsidian vault ~/notes. It creates a file in my “Inbox” with the filename and then opens up the note in Neovim.
Auto formatting notes
Now, I am inside Tmux pane 3, with a new note that I created e.g. on "test123", and I am inside Neovim ready to make the note.
This is all fine. But there is no yaml frontmatter created yet. There’s no formatting. This is where I have a key binding setup inside Neovim that creates the formatting for me. I have the space key set up to be my <leader> key, So I then press space o, n.
This does the following inside Neovim:
keymap.set("n", "<leader>on", function() if vim.fn.bufname('%') == '' and vim.fn.line('$') == 1 and vim.fn.getline(1) == '' then local title = vim.fn.input("Enter note title: ") if title == "" then print("Title cannot be empty!") return end local dir = vim.fn.expand("~/notes/00 - Inbox/") local filename = dir .. title .. ".md" vim.fn.mkdir(dir, "p") vim.cmd("edit " .. filename) vim.cmd("write") end local original_cwd = vim.fn.getcwd() vim.cmd("cd ~/notes") vim.cmd(":Obsidian template note") vim.cmd("cd " .. original_cwd)end, { desc = "Create Obsidian note with template" })If the current buffer is a brand-new empty buffer, it asks me for a note title, creates ~/notes/00 - Inbox/\<title>.md, opens and saves it.
Then changes to ~/notes, runs the :Obsidian template note command (from Obsidian/obsidian.nvim plugin), and after I’m done, returns me back to the original working directory.
Detailed explanation
keymap.set("n", "<leader>on", function()- keymap.set creates a key mapping in normal mode.
if vim.fn.bufname('%') == '' and vim.fn.line('$') == 1 and vim.fn.getline(1) == '' then-
This if checks whether the current buffer appears to be a completely empty, new buffer:
-
vim.fn.bufname('%') == ''→ buffer has no name (not saved to disk). -
vim.fn.line('$') == 1→ buffer has exactly one line. -
vim.fn.getline(1) == ''→ that single line is empty.
-
If all three true → it’s an empty/new buffer. The code inside the if statement will run only in that case.
local title = vim.fn.input("Enter note title: ")- Prompt the user (in the command line area) to enter a title string. The response is stored in title.
if title == "" then print("Title cannot be empty!") return end- If the user pressed enter without typing anything, print a message and return from the function. That stops the whole mapping here (so the later Obsidian steps are not executed).
local filename = dir .. title .. ".md" vim.fn.mkdir(dir, "p")-
Concatenate to form the full filepath, e.g. /home/you/notes/00 - Inbox/My note.md.
-
Ensure the directory exists. “p” flag creates parent directories as needed (like
mkdir -p).
vim.cmd("edit " .. filename)- vim.cmd runs an Ex command. This opens (edits) the file filename. If it didn’t exist, a new buffer for that file is created.
vim.cmd("write") end-
Save the buffer to disk, creating the file.
-
End of the if statement that handled the empty buffer flow.
local original_cwd = vim.fn.getcwd()- Save current working directory so we can restore it later.
vim.cmd("cd ~/notes")- Change the current working directory to ~/notes. (This is required because the Obsidian plugin/command probably expects to be run from the vault root.)
vim.cmd(":Obsidian template note")- Executes
:Obsidian template noteas a command. This is explained further below.
vim.cmd("cd " .. original_cwd)- Go back to the previous working directory
end, { desc = "Create Obsidian note with template" })- End the keymap and add a description
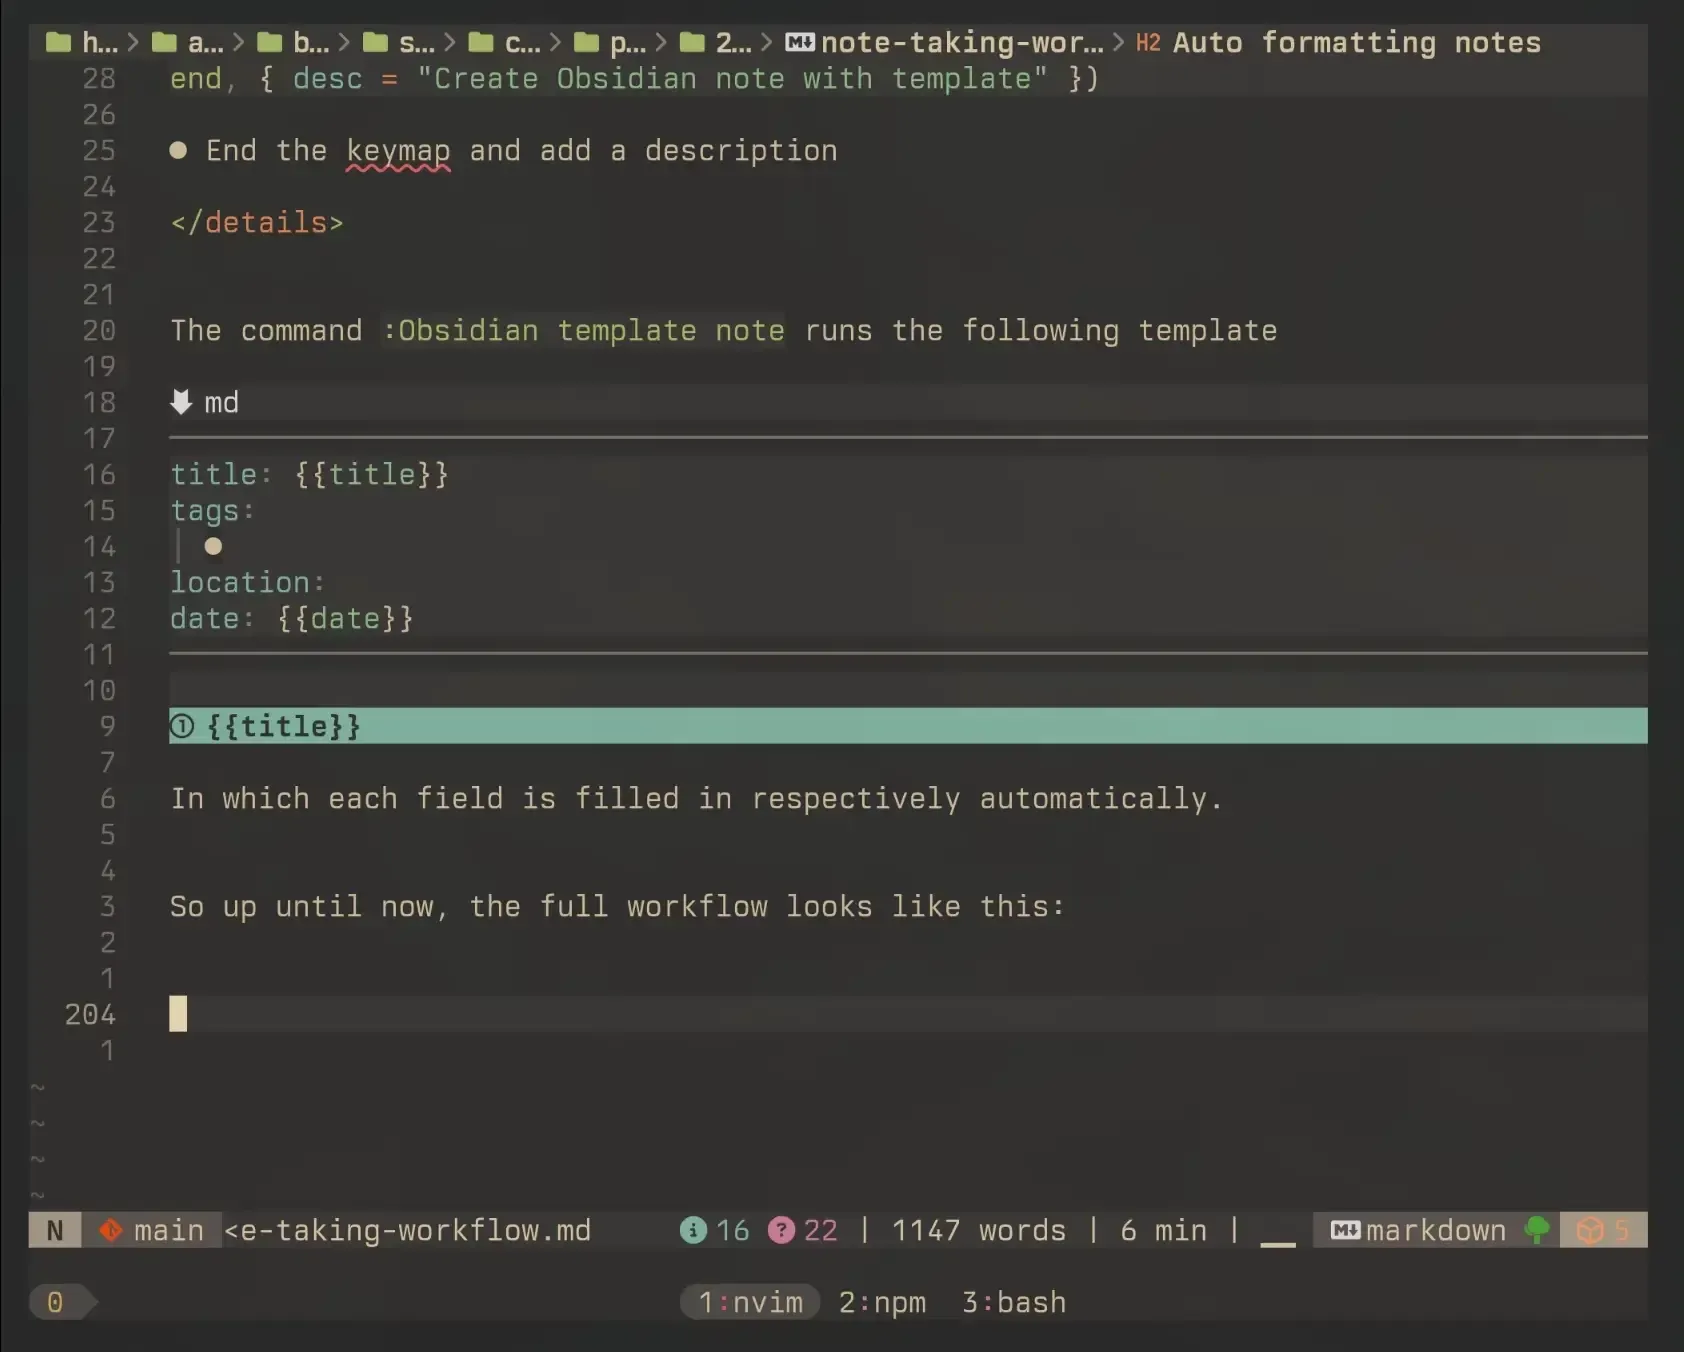
The command :Obsidian template note runs the following template
---title: {{title}}tags:  -location:date: {{date}}---
# {{title}}
In which each field, {{date}} and {{title}} is filled in respectively automatically.
So up until now, the full workflow looks like this:
Sorting the Inbox
So I then can write the note to whatever I want it to be. Then once I’m done I save and quit :wq .
A key to this workflow, you’ll notice in the yaml there is a location field. This is important. Currently, all these new notes are saved in the same location ~/notes/00 - Inbox. This is in the Inbox essentially unsorted notes. Therefore, the location field I use when I want to sort the note into the respective location.
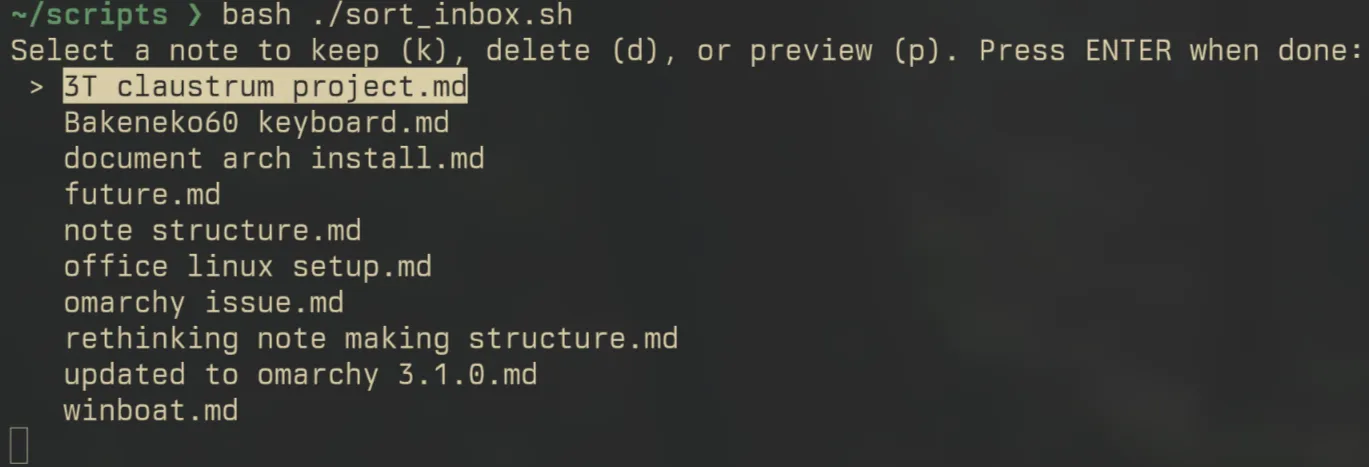
About once a week, or when I feel the inbox is getting full, I run another command in the terminal: sort_inbox:
#!/usr/bin/env bash
# Enhanced menu function with color support
menu() {    local prompt="$1" outvar="$2" selected_outvar="$3"    shift 3    local options=("$@")    local count=${#options[@]}    local cur=0    local esc=$(echo -en "\e")    local selected=() # Array to track "keep" (green) or "delete" (red)    for ((i=0; i<count; i++)); do        selected[i]=0 # Default to no action    done
    printf "$prompt\n"    while true; do        # Render menu options with colors        for ((i=0; i<count; i++)); do            if [ "$i" -eq "$cur" ]; then                if [ "${selected[i]}" -eq 1 ]; then                    echo -e " > \e[32m${options[i]}\e[0m (keep)" # Green for keep                elif [ "${selected[i]}" -eq 2 ]; then                    echo -e " > \e[31m${options[i]}\e[0m (delete)" # Red for delete                else                    echo -e " > \e[7m${options[i]}\e[0m" # Highlight current option                fi            else                if [ "${selected[i]}" -eq 1 ]; then                    echo -e "   \e[32m${options[i]}\e[0m (keep)" # Green for keep                elif [ "${selected[i]}" -eq 2 ]; then                    echo -e "   \e[31m${options[i]}\e[0m (delete)" # Red for delete                else                    echo "   ${options[i]}"                fi            fi        done
        # Read user input (single character, no need for Enter)        IFS= read -rsn1 key
        if [[ $key == $esc ]]; then            read -rsn2 -t 0.1 key # Read remaining escape sequence characters            if [[ $key == '[A' ]]; then                ((cur--)); ((cur < 0)) && cur=$((count - 1))            elif [[ $key == '[B' ]]; then                ((cur++)); ((cur >= count)) && cur=0            fi        elif [[ $key == "k" ]]; then            selected[cur]=1 # Mark as keep        elif [[ $key == "d" ]]; then            selected[cur]=2 # Mark as delete        elif [[ $key == "p" ]]; then            # Show preview of the selected note using 'bat'            local selected_note="${options[$cur]}"            local note_path="$notes_dir/$selected_note"
            # Save the cursor position            tput sc
            echo -e "\nPreviewing note: $selected_note\n"            bat --paging=never --line-range :100 --color=always "$note_path"  # Show the content of the selected note with 'bat'
            echo -e "\nPress any key to continue..."            read -rsn1 # Wait for user to press a key to continue
            # Restore the cursor position and clear the preview            tput rc            tput ed
        elif [[ $key == "" ]]; then            break        fi        echo -en "\e[${count}A" # Move cursor up to re-render    done
    # Output the final selection    printf -v "$outvar" "${options[$cur]}"    eval "$selected_outvar=(${selected[@]})"}# Function to extract and clean the tag from a YAML-formatted noteextract_tag() {    local file="$1"    # Using awk to get the tag line and sed to clean it up    local tag=$(awk -F': *' '/location:/{print $2; exit}' "$file" | sed -e 's/^ *- *//' -e 's/^ *//;s/ *$//')    # local tag=$(awk '/tags:/{getline; print; exit}' "$file" | sed -e 's/^ *- *//' -e 's/^ *//;s/ *$//')    echo "$tag"}
# Function to find the appropriate folder based on the cleaned tag (handles spaces)find_folder() {    local tag="$1"    # Use find with iname to handle spaces and case insensitivity    local folder=$(find "$HOME/notes" -type d -iname "$tag" 2>/dev/null | head -n 1)    echo "$folder"}
# Main script to manage notesnotes_dir="$HOME/notes/00 - Inbox"notes=("$notes_dir"/*) # Array of all notes in the Inboxnote_names=()
if [ ! -e "${notes[0]}" ]; then    echo "No files in Inbox."    exit 0fi
for note in "${notes[@]}"; do    note_names+=("$(basename "$note")")done
selected_note=""declare -a actionsmenu "Select a note to keep (k), delete (d), or preview (p). Press ENTER when done:" selected_note actions "${note_names[@]}"
confirm=""menu "Confirm your choices (ok to apply, cancel to discard):" confirm _ "ok" "cancel"
if [[ $confirm == "ok" ]]; then    for ((i=0; i<${#actions[@]}; i++)); do        note_file="${notes[i]}"        if [[ ${actions[i]} -eq 1 ]]; then            tag=$(extract_tag "$note_file")            if [ -n "$tag" ]; then                folder=$(find_folder "$tag")                if [ -n "$folder" ]; then                    mv "$note_file" "$folder"                    echo "Moved '${note_names[i]}' to '$folder'"                else                    echo "location: '$tag' not found. Skipping '${note_names[i]}'."                fi            else                echo "No location found in '${note_names[i]}'. Skipping."            fi        elif [[ ${actions[i]} -eq 2 ]]; then            rm -f "${note_file}"            echo "Deleted '${note_names[i]}'"        fi    doneelse    echo "No changes made."fi
This script looks complex, but it really isn’t. The reason it looks complex is that I have a menu that shows what notes are in the inbox by the note title. The menu is able to highlight each entry in the menu and change the colour of an entry depending on if I wanted to keep the note or delete the note. I also have a preview option here which is just opening the note using bat which is just a fancy version of cat. In then select which notes I want to keep, delete or preview. It looks like this:
After I have gone through the menu and decided which notes I want to keep or delete. The script locates the location: in the yaml of each note. Then the script recursively searches for the corresponding folder across the ~/notes directory. Once a match is found it moves the note from the inbox and places the note in the respective directory.
Other Neovim obsidian commands
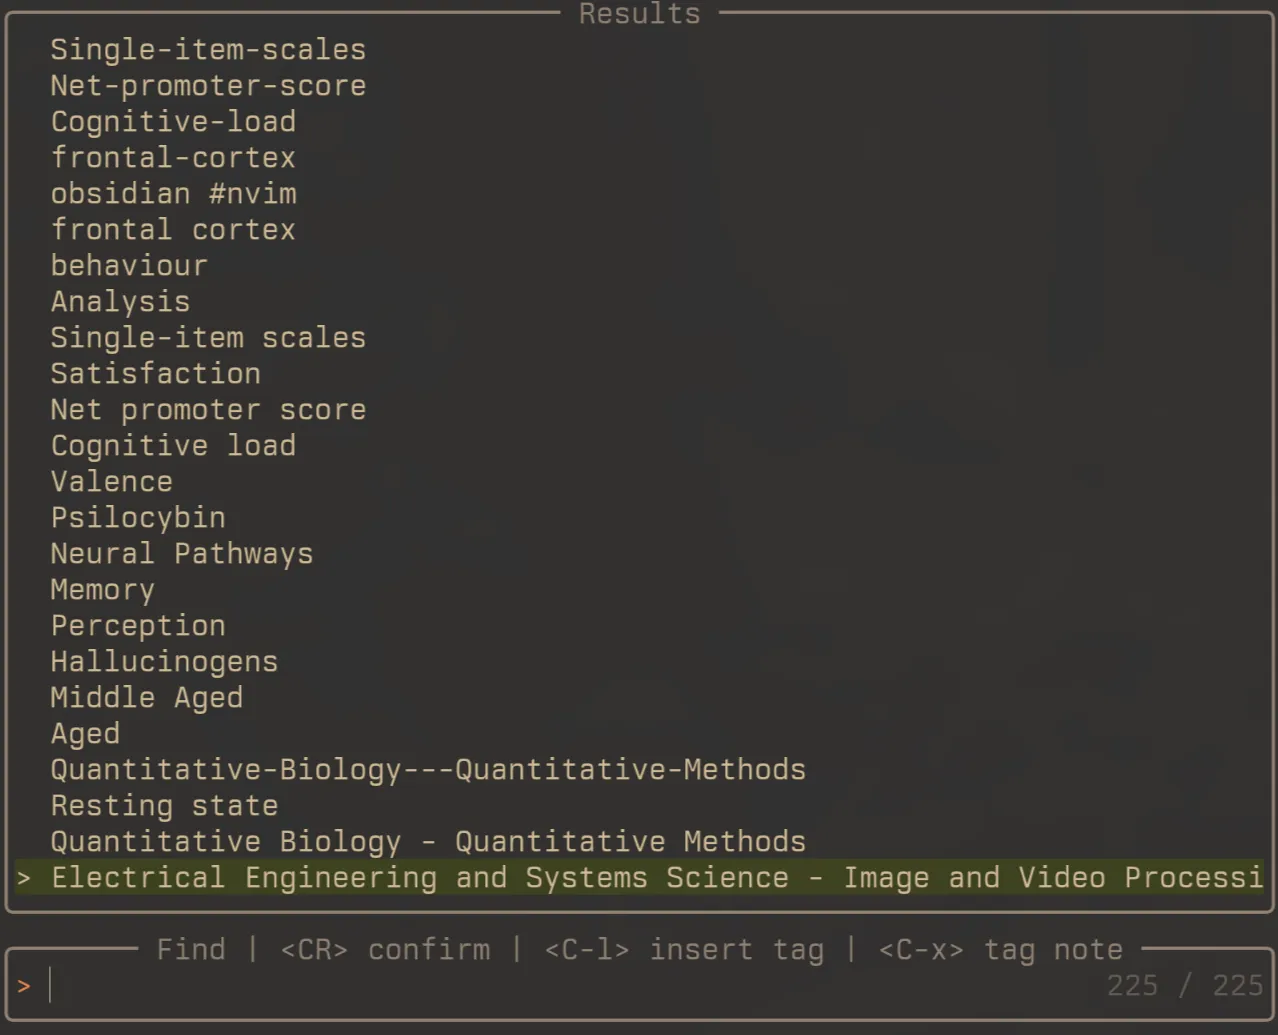
There are other commands that are worthy of mentioning here. For example, if I wanted to use any of the other templates I can use :obsidian template inside neovim and pick the template that I want to use in telescope.nvim. Similarly, if I want to add a tag1 to the note I can search for all pre-existing tags and add them to the note by using the function :obsidian tag.
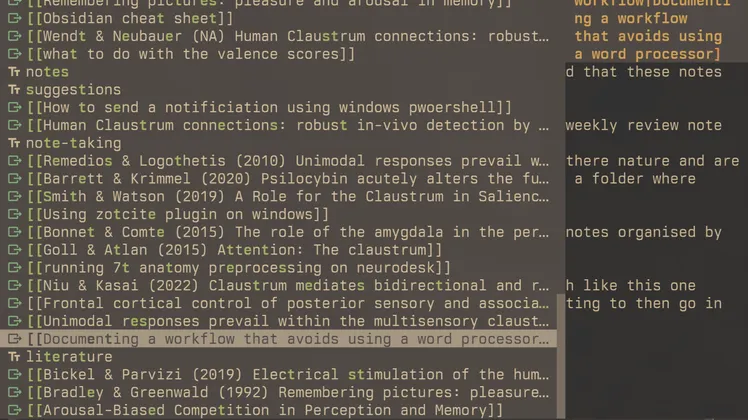
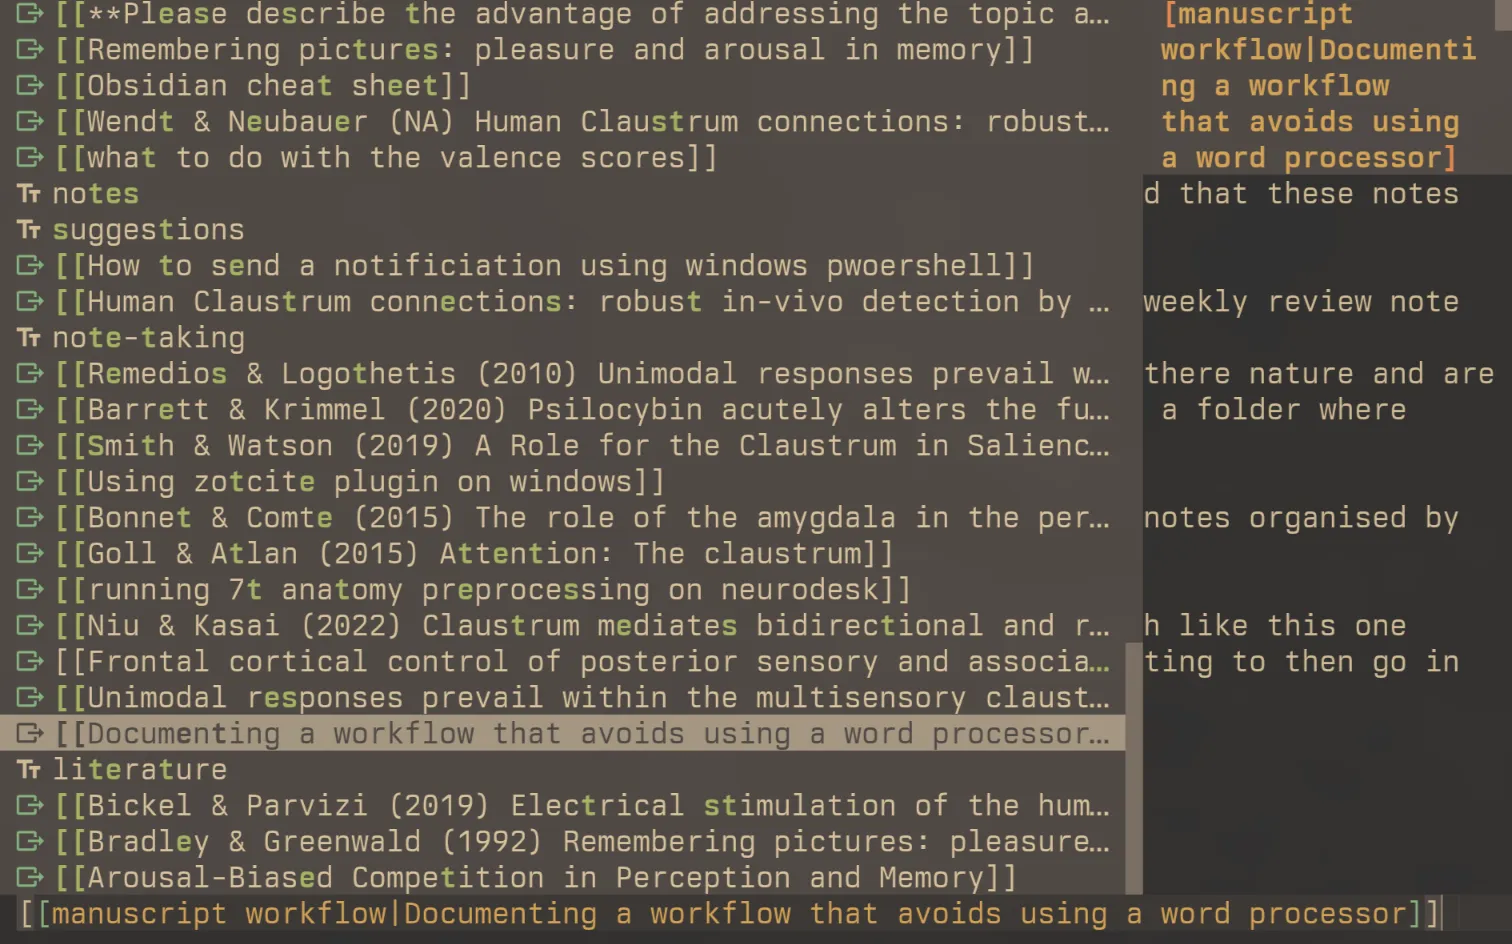
Another important aspect of the workflow, and a common concept in obsidian is linking across notes. The plugin obsidian nvim has a builtin LSP that is triggered when the current working directory is inside the vault and can be triggered by typing [[. This then pulls up a menu with all notes in which you can search for the note you want to link to.
Wrapping up
To summarise this workflow. I use a script on to create a new note in my vault inbox and open up Neovim. Inside Neovim I use a key binding that triggers auto-completion of the yaml frontmatter. I add in the yaml frontmatter the folder name that the note belongs into. Then at the end of the week I run sort_inbox.sh and decide which notes to keep or delete in the inbox. Those notes that I want to keep are sorted into their respective folders.
I use Neovim instead of Obsidian alone (which I’d like to think of Obsidian here as being some sort of backend) because of the handy commands that are included in the obsidian nvim plugin. This also means that you can really tailor the system to how you want to use it. For me, this whole system has been developed on speed and I have tried to make it as low-overhead for me as possible. At the end of the day, I don’t have time to be thinking about or even considering doing these things manually.
Footnotes
-
There is a debate about whether or not tags are useful to people, but I find use in them particularly with a Neovim workflow. ↩
Reactions
Comments
Loading comments...